TotalOne CSP partner Signup.
STEP-by-step guide
Great CSP Business Experience Starts Here!
SignUp in 3 Easy Steps
As simple as that!
START NOW
STEP 1:
Fill out basic company information and contact details on Total One Signup page
1.1 To start the Signup process, go to Total One Signup page:
https://sign-up-westeurope.homerun.cloud/OnBoard/StepOne
1.2 Fill out information about your company and click Next.

1.3 Fill out Primary Contact details.
Primary Contact is the first one to get all notifications, updates and changes related to the Platform.
Optionally, add information about a Secondary Contact, and click Submit.

1.4 After submitting all required data, you, if indicated as a Primary Contact, will receive a verification email. Confirm your email address by clicking on the button Verify email.

1.5 When email address has been successfully verified, you will receive a second email with a unique (one-time) Signup link for connecting Total One Platform to Microsoft CSP Partner Center tenant (see Step 3).
Do NOT activate the link before you finish Step 2!
1.6 Unique Signup link received?
Close the Signup page.
Step 1 is completed!
If you do not receive a Verification email or your unique Signup link within 10 minutes, contact us
START NOW
STEP 2:
Create User Account and Web App Secret in Microsoft CSP Partner Center

In this Step, you create a Service Account and a Web App Secret (Password) to prepare for connecting Total One Platform with your CSP Partner Center tenant.
Service Account is a Partner Center Global Admin Account exclusively used for communication between Total One Platform and CSP Partner Center.
2.1 To create a new user account, go to Office 365 /Admin Center / Active Users:
https://admin.microsoft.com/Adminportal/Home?source=applauncher#/users
2.2 Enter user account name
Typically, user account is named: total.one@yourdomain.onmicrosoft.com
Replace "yourdomain" with your real Azure AD tenant domain.
2.3 Assign Global Admin permissions to the user account
Your new account must be a Global Admin in Office 365.

I'm a paragraph. Click here to add your own text and edit me. Let your users get to know you.
2.4 Set a strong password!
Strong password has 12-16 characters, capital letters, lowercase letters, digits and special characters.
See password restrictions of Microsoft with max. 16 characters and no spaces:
https://social.technet.microsoft.com/wiki/contents/articles/40140.office-365-password-policy.aspx
2.5 Set Password policy to "Password does not expire".
Store the password in a safe place, for example, in a dedicated Password Manager, such as Keepass: https://keepass.info/download.html. You will use the password only occasionally.
It is mandatory that the account is MFA-enforced (Multi-Factor Authorization).
Most probably your organization already has an AzureAD Policy in place. The policy enforces MFA setting on your Administrators.
Check your Access Policy here: https://portal.azure.com
(see the screenshot below)
If this policy is not enabled, you can configure enforced MFA in Office 365 Portal:
(see the screenshot below)
For MFA, we usually recommend Microsoft Authenticator App installed on your Mobile device.
Here are the links to Apple App Store and Google Play Store:
You can also enroll with SMS and email notifications only.


2.6 To assign permissions to your new account in Partner Center, open browser and log into Microsoft Partner Center using an existing account with Global Admin permissions:
2.7 Find your newly created user account and assign the permissions as shown in the screenshot below.
Manages your organization's account as - Global Admin
Assists your customers as - Admin Agent
Manages your organization's incentives for one or more locations - Entire Organization and Incentive Administrator

2.8 Make a cross-check in Office365 or Azure AD Portal if your new account is a member of the Security Group Admin Agent.
If your new account is not a member of the Admin Agent Security Group, add it to the Group.
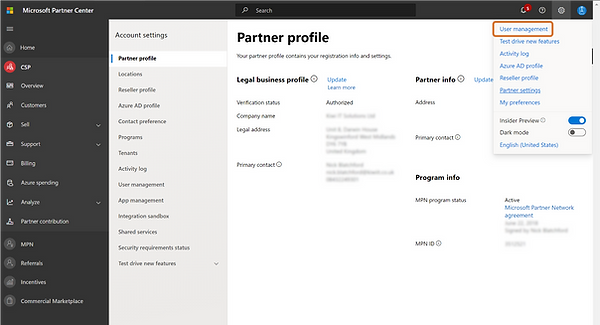
2.9 To get your Web App ID and Web App Secret,
go to Microsoft Partner Center and click on the Settings icon in the upper right corner of the Partner Center navigation. Select Partner Settings.

2.10 In Web App Management, copy App ID and paste it to Notepad.

2.11 In Web App Management, create a new Web App Secret with a validity of 2 years.

Copy the Secret and paste it to Notepad.
In most cases, this copy/paste action adds unnecessary spaces at the end of the Secret. Remove them!
Also copy the Secret's expiration date and save it together with the rest of the information.

We recommend to store the combination of Web App ID and Secret in a Password Vault of your choice.
The Secret is used to access Partner Center and is also your Decryption Key in Total One Platform.
In the Total One Platform, this information is stored at rest end-to-end encrypted. Additionally, credentials are stored in an Azure Key Vault.
The information is only accessible by the application. No person has access to it!
DO NOT LOSE the Web App Secret! Remember where you saved it!
Azure Key Vault has no backdoors or master keys.
2.12 IMPORTANT! Activate MFA and log in with your new user account.
Open an Incognito Browser Session and log into Partner Center with your new user account total.one@yourdomain.onmicrosoft.com: https://partner.microsoft.com/en-us/dashboard

2.13 You will be requested to enroll into MFA.
Follow the on-screen instructions.
For further help use this link:

If you experience any difficulties, please turn to your local IT department for support.
2.14 After a successful login, you see the standard Microsoft Partner Center screen.
To cross-check that all permissions are correctly configured, go to Users and check if the account has the following permissions:
Global Admin
Admin Agent
Incentives Admin
2.15 Go through a few pages: check if you see your Customers, Billing data, etc.
If everything is set correctly, you should see the same information as with your regular account.
Looks good? Excellent!
To finalize Step 2,
Register and authorize Total One App in your Azure AD
It is necessary for using Microsoft Graph API so that you can manage Users, Groups, Devices, etc.
2.16 Go to Azure Portal: https://portal.azure.com
and log in as Global Administrator in Azure AD.
2.17 Go to App Registrations.

2.18 Click on the New Registration button.

2.19 Fill in the information as shown in the screenshot below and
click on the button Register at the bottom of the page.

2.20 Copy and save in Notepad Web App Client ID of the registered application.
You will need it in Step 3 together with the Web App and Web App Secret from CSP Partner Center.

2.21 Go to Certificates & Secrets and create a new Secret by clicking on the New Client Secret.

2.22 Fill in the information as shown in the screenshot below and press Add.

2.23 Copy and save in Notepad the Value of the Client Secret - Total One Web App Secret.
It will also be required in the following Step 3.

2.24 Go to API Permissions tab. Click Add a Permission.

2.25 Choose Microsoft Graph.

2.26 In Application Permissions, add the following permissions:
-
Directory.ReadWrite.All
-
Group.ReadWrite.All
-
RoleManagement.ReadWrite.Directory
-
User.ReadWrite.All

2.27 In Delegated Permissions, add the following permissions:
-
User.Read
2.28 As a result, your API Permissions list should look as in the screenshot below.
Make sure that entries in the Type column coincide with the ones in the screenshot.

2.29 Grant Admin Consent by clicking on the corresponding button.

2.30 Finally, add Total One App as a member of the AdminAgents Group.
Go to Azure Active Directory.

2.31 Go to Groups.

2.32 Select AdminAgents Group.

2.33 Select Members.
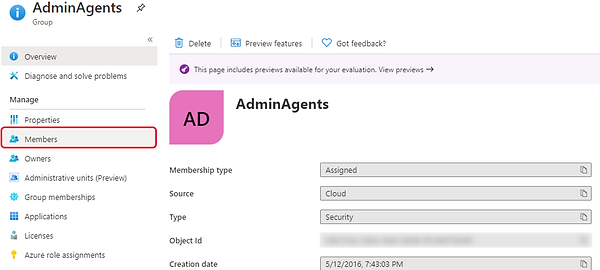
2.34 Click Add Members and select Total One App that you have added in Step 2.19

Step 2 is completed!
Nothing can stop you now!
You are ready to connect your CSP Partner Center and Azure AD tenant to Total One Platform.
STEP 3:
Authorize Total One Platform to interact with your Azure AD and Microsoft Partner Center tenant
3.1 After completing Step 1, you have received the email with the unique Signup link.
This is a ONE-time link (valid for 48h)!
Use it only when you have completed Step 1 and Step 2
Open an Incognito Browser Session. Copy the Signup link to the Incognito Browser Session.
Using an Incognito Browser session is extremely important for the first authorization!
Browsers use cached identities. It means that your regular (cashed) username could be automatically sent to the Signup portal. To avoid this, use an Incognito Browser page.
Have Web App IDs, Web App Secrets and Native App ID from Step 2 ready.
If you experience any issues with the unique Signup link, contact us
We will send you a new link via email.
3.2 Accept the Platform's Terms of Use and Privacy Policy by checking the box and clicking on Accept.

3.3 Insert Web App Client ID and Total One Web App Secret as shown below and click Next.

3.4 Insert your CSP Partner Center Web App ID, Web App Secret and Native App ID as shown below and click Next.

3.5 Log in with your newly created user account by entering Username and Password from Step 2.
3.6 To grant Total One App access to your CSP Partner Center tenant, click Accept.
Congratulations!

Step 3 is completed!
3.7 You did it!
Now give us some time to synchronize your customers and to make sure everything is up and running.
Shortly you will receive a Confirmation email and can start using your Total One tenant.
You are going to LoveIT !
See you on Total One Platform!
Have any questions left? Feel free to contact us.
START NOW